


Just received your brand new PC? Opening for the first time on Christmas Day and struggling to figure out what to do? Read through our helpful FAQs that will get up and running in no time, so you can spend your time doing the more important things.
8 Steps to Guarantee your Setup goes Smoothly:
IF YOU'VE PURCHASED AS A GIFT BEFORE WRAPPING PLEASE OPEN AND CHECK JUST IN CASE THERE IS ANY PROBLEMS!
Step 1: Check your Packaging!
Whilst some of this advice might seem silly, some of it might be a lightbulb moment for you. We've seen a handful of people purchase a brand new PC that had a few small airbags for protecting the components in the case and proceeded to fire it up without removing said airbags, and you can imagine the rest...
Inside your PC case you may find that we've inputted some Air Bags or Expanding Foam used to protect the expensive internal components such as the Graphics Card. We do tend to note on the builds "PLEASE REMOVE" but please make sure to remove all of these materials and check carefully that no polystyrene has made its way into the chassis or fans. It is also helpful to check none of the installed PCIe cards are loose, and everything looks to be in its place.
If you're unsure please contact us.
Step 2: Check what Connections you need to Use!
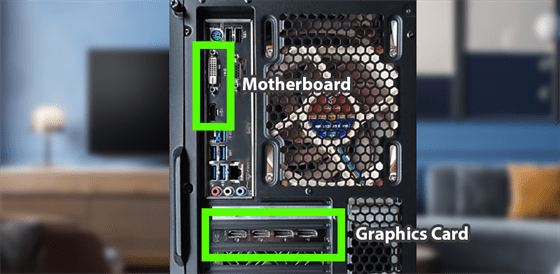
If you've purchased a Gaming PC from us with a dedicated Graphics Card you might find it a bit confusing when wondering what to plug into on the back of your PC. Below the image shows what part of the back is the Motherboard and what is the Graphics Card.
Rear View Of PC/Motherboard
If your PC has a Dedicated Graphics card you need to make sure you plug into the Graphics Card as the motherboard connections will not work. If your PC doesn't have a Dedicated Graphics card you don't need to worry about this as you'll only see the Motherboard connections.
Step 3: Get it Turned On!
Once you're happy with where you're connecting your monitor, it's time for the BIG ONE! Getting all your peripherals plugged in, including your mouse, keyboard and anything else you want plugged in. Then put the provided power cable into the PC
If your PC has a Dedicated Graphics card you need to make sure you plug into the Graphics Card as the motherboard connections will not work. If your PC doesn't have a Dedicated Graphics card you don't need to worry about this as you'll only see the Motherboard connections.
Step 4: Set up a Backup!
It's always good practice to setup a Backup for your PC just in case anything goes wrong. This is really simple to do in Windows. Simply search for Backup in the start menu and follow the instructions for backing up your files to another drive. You can make a Backup routine to which your PC will Backup at regular intervals.
Step 5: Installing Drivers & Important Applications!
When building up all our PCs, we make sure that all the drivers and updates are installed in order to allow the computer to function correctly. Overtime there will be new updates out for your components. Two main updates will include the Graphics Card driver. If you're using a Nvidia Graphics Card, you'll most likely see the Nvidia GeForce panel in the bottom right hand corner of your Task Bar. This will notify you when a new driver is available. Windows will also have new updates come out every so often, these are set to install automatically.
You can start installing any applications you want on the PC whether that is games, office applications or anything else you intend to run. A great place for games is steam.
Steam - https://store.steampowered.com/about/
Step 6: Setup your Network
Depending on how you intend on connecting the PC to your Network you have two options. One would be plugging in an ethernet cable to the ethernet port on the back of the PC. Your Network will then automatically be picked up and allow you to start using the internet straight away. If you intend on using Wi-Fi you'll need to make sure that you have either your Wi-Fi USB or Wi-Fi Antennas installed on the back on the PC, then go to the WiFi icon in the bottom right of your task bar, select your Wi-Fi and enter your Wi-Fi password. Afterwards you'll be all set to use the internet!
Some may skip past this advice, but it will be useful if you have any intention of sharing your files and documents with other devices, such as a laptop or phone.
Setting this up at the start will enable you to share videos to your smart TV, share files across your network among other things.
Click on the start menu and click Settings.
Click on Network & Internet Settings.
If your connection type is "Public", you'll need to change that by clicking Connection Properties and choosing "Private" as the network profile. Click back twice to return to the main network settings view.
Scroll down until you see "Network and Sharing Centre" and click it.
On the next window you will see an option in the sidebar to "Change advanced sharing settings". Click this.
You will now see the options for your "Private" network.
The two options you want to switch on are "Turn on network discovery" and "Turn on file and printer sharing".
Next go to "All Networks" and turn on sharing for "Public folder sharing" and then choose media streaming options. Scroll down and select "Turn off password-protected sharing". This means other devices can access your PC files without entering a password. This is ideal for DLNA sharing and streaming.
Next, you will need to select some folders that you want to share. To do this, right click on any folder you want to share with the network, select "Give access to" and then select "Everyone" from the dropdown menu and click Share.
That's it!
Step 7: Monitor Everything!
To make sure your gaming PC is always running correctly, you can install one of the many monitoring applications that are available online. This will help you identify any thermal issues early, as well as monitoring your framerates when gaming. The main two applications we advise installing are the following:
Core Temp - https://www.alcpu.com/CoreTemp/ - Used to monitor the temperature of your CPU.
HWMonitor - https://www.cpuid.com/softwares/hwmonitor.html - Reads PC systems main health sensors : voltages, temperatures, powers, currents, fans speed, utilizations, clock speeds. The all in one package.
Step 8: Last Word!
There's nothing more to add, other than enjoy that new gaming PC feeling for as long as possible! You'll never experience the speed and performance as much as when it is box fresh and smells like it just rolled off the production line. So, enjoy it. And if you ever need any help in keeping your PC running smoothly and feeling as new as possible, you can always contact us via our Live Chat, phone or via email and we'll be happy to help with any question you may have.

