


Welcome to Your New PC
Whether you've got a Gaming PC, Home/Office PC or Workstation follow these simple steps to get your new computer up and running in no time. View our step by step full guide below.
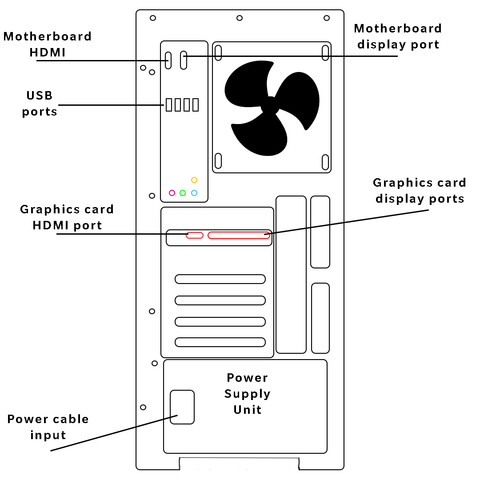
Unbox & Connect
Carefully unpack your PC and connect the power cable, monitor, keyboard, and mouse
Power On
Press the power button and load your PC system to the desktop
Connect to Internet
Connect to your Wi-Fi network or plug in an ethernet cable for internet access
Install Updates
Allow Windows to download and install the latest updates for optimal performance
Step-by-Step PC Setup Guide
Carefully remove your PC from the box and place it on a flat, stable surface. Inside the case you may find Instapak protective foam (used to secure the graphics card during transit) and/or air bags.

Example image showing protective Instapak foam inside the PC
⚠️ Important:
Before powering on the PC, all internal packaging must be removed.
- 1) Open the side panel of the case
- 2) Gently remove the Instapak foam and any air bags
- 3) Double-check that nothing is left inside the system
This packaging is only there to protect components during delivery and must not be in the PC when it’s turned on.
Once everything has been removed and the side panel is securely back on, you’re ready to move on to the next step.
Common PC Issues & Solutions
Find quick solutions to the most common PC problems our customers encounter
First, check that the power cable is securely connected to both the PC and the wall outlet. Verify the power outlet works by testing it with another device. Check if the power supply switch on the back of the PC is turned on. If using a power strip, ensure it's switched on. Try a different power cable if available. If none of these work, the power supply unit may need replacement.
Slow performance can be caused by several factors: insufficient RAM, a full hard drive, too many startup programs, malware, or outdated drivers. Try restarting your PC, closing unnecessary programs, running a virus scan, clearing temporary files, and ensuring Windows is up to date. Consider upgrading to an SSD or adding more RAM if the issue persists.
Check that your monitor is powered on and the cable is securely connected to both the monitor and PC. Try a different video cable or port if available. Ensure the monitor input source is set correctly. If using a dedicated graphics card, make sure the cable is connected to the graphics card, not the motherboard. Try connecting to a different monitor to determine if the issue is with the display or PC.
Note the error code displayed on the blue screen. Restart your PC and check for Windows updates. Update all drivers, especially graphics and chipset drivers. Run Windows Memory Diagnostic to check for RAM issues. Scan for malware. If the problem started after installing new hardware or software, try removing it. Use System Restore to revert to a previous working state. If BSODs persist, the issue may be hardware-related.
Random restarts are often caused by overheating, power supply issues, or driver problems. Check that all fans are working and clean out dust from vents. Monitor CPU and GPU temperatures using software. Ensure the power supply is adequate for your components. Update all drivers and Windows. Disable automatic restart on system failure to see error messages. Check Event Viewer for clues about what's causing the restarts.
Restart your PC and router. Check if Wi-Fi is enabled on your PC (look for a physical switch or function key). Ensure airplane mode is off. Update your network adapter drivers. Run the Windows Network Troubleshooter. Forget the network and reconnect by entering the password again. Check if other devices can connect to the same network. If they can, the issue is with your PC's Wi-Fi adapter.
Some fan noise is normal, especially under load, but excessive noise isn't. Loud grinding or clicking sounds from the hard drive indicate it may be failing - back up your data immediately. Rattling sounds suggest a loose component or cable touching a fan. High-pitched whining could be coil whine from the power supply or graphics card. Clean dust from fans and heatsinks. If noise persists, identify which component is making the sound and consider replacement.
Try different USB ports to determine if the issue is port-specific. Restart your PC. Check Device Manager for any devices with yellow exclamation marks. Update USB controller drivers. Disable and re-enable USB controllers in Device Manager. Check if USB selective suspend is causing issues in Power Options. Try the device on another computer to rule out device failure. Ensure the USB port isn't physically damaged.
Check Power Options settings to ensure sleep is configured correctly. Update all drivers, especially chipset and graphics drivers. Disable devices from waking the computer in Device Manager if they're causing unwanted wake-ups. Run 'powercfg /requests' in Command Prompt to see what's preventing sleep. Check for Windows updates. Some programs prevent sleep - close unnecessary applications before attempting sleep mode.
For wired devices, try a different USB port. For wireless devices, check batteries and ensure the receiver is properly connected. Restart your PC. Try the device on another computer to rule out device failure. Check Device Manager for driver issues. Update or reinstall drivers. For PS/2 devices, ensure they're connected before booting. Check if the device is disabled in BIOS settings.
Check that speakers or headphones are properly connected and powered on. Ensure volume isn't muted in Windows or the application. Right-click the volume icon and select 'Open Sound settings' to verify the correct output device is selected. Update audio drivers. Run the Windows Audio Troubleshooter. Check if the audio service is running. Try different speakers or headphones to isolate the issue.
Clean dust from all vents, fans, and heatsinks using compressed air. Ensure your PC has adequate ventilation and isn't in an enclosed space. Check that all fans are spinning properly. Reapply thermal paste to the CPU if it's old. Monitor temperatures using software like HWMonitor. Ensure case fans are oriented correctly for proper airflow. Consider adding more case fans or upgrading the CPU cooler if temperatures remain high.
Use Disk Cleanup to remove temporary files and system files. Empty the Recycle Bin. Uninstall programs you no longer use. Move large files to an external drive or cloud storage. Use Storage Sense to automatically free up space. Delete old Windows installation files if you've recently updated. Clear browser cache and downloads folder. Consider upgrading to a larger drive if you consistently run out of space.
Run the Windows Update Troubleshooter. Restart the Windows Update service. Clear the Windows Update cache by deleting contents of C:\Windows\SoftwareDistribution. Ensure you have enough disk space. Temporarily disable antivirus software. Run 'sfc /scannow' and 'DISM /Online /Cleanup-Image /RestoreHealth' in Command Prompt as administrator. Check your internet connection. If a specific update fails repeatedly, search for the error code online for specific solutions.
Try booting into Safe Mode by pressing F8 during startup. Use System Restore to revert to a previous working state. Run Startup Repair from the Windows Recovery Environment. Check if recently installed hardware or software is causing the issue. Ensure the boot order in BIOS is correct. Check for hard drive errors using CHKDSK. If you see a specific error message, search for it online. As a last resort, consider reinstalling Windows while preserving your files.
Disconnect from the internet to prevent further infection. Boot into Safe Mode with Networking. Run a full scan with Windows Defender or your antivirus software. Use additional malware removal tools like Malwarebytes. Remove suspicious programs from Control Panel. Check browser extensions and remove unknown ones. Reset browser settings if needed. Change passwords after cleaning. Consider a clean Windows installation for severe infections.
Update your graphics card drivers to the latest version. Lower in-game graphics settings. Close background applications to free up resources. Ensure your PC meets the game's minimum requirements. Check for game updates and patches. Verify game files through the game launcher. Monitor temperatures to ensure components aren't overheating. Disable overlays from Discord, GeForce Experience, etc. Check if Windows Game Mode is helping or hindering performance.
The CMOS battery on your motherboard may need replacement. This is a small coin-cell battery that maintains BIOS settings when the PC is off. Enable internet time synchronization in Windows to automatically correct the time. Check if the time zone is set correctly. Ensure Windows Time service is running. If the battery is old (3-5 years), replacing it is inexpensive and will solve the issue permanently.
Wait a few minutes as the PC may be processing a task. Try Ctrl+Alt+Delete to open Task Manager and end unresponsive programs. If that doesn't work, press and hold the power button for 5-10 seconds to force shutdown. After restarting, check for Windows updates, run a virus scan, and update drivers. If freezing occurs regularly, check for overheating, RAM issues, or hard drive problems.
Use Windows Backup to create regular backups to an external drive. Enable File History to automatically back up your documents. Use cloud storage services like OneDrive, Google Drive, or Dropbox for important files. Create a system image for complete PC backup. Follow the 3-2-1 rule: 3 copies of data, on 2 different media types, with 1 copy offsite. Regularly test your backups to ensure they work when needed.

